Practice 1: follow line
In this practice we will use the Gazebo simulator, the Jderobot platform (we rely on the code) and the OpenCV library for image processing. To use the OpenCV library have to import with “import CV2”.
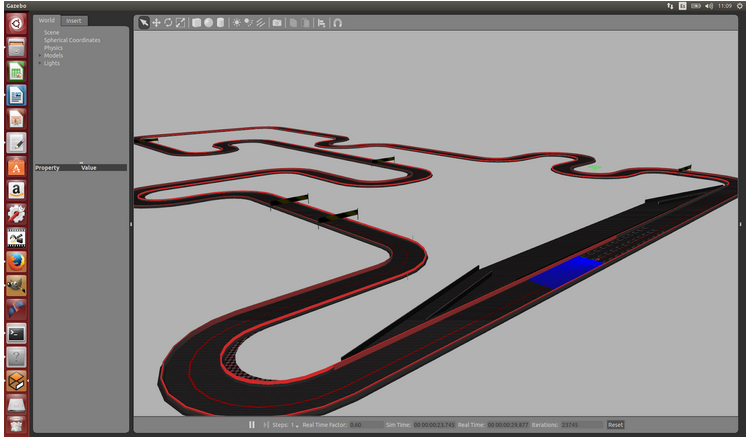
The practice is to perform a PID control reagent and complete a lap of the Formula 1 circuit. To achieve this goal our Formula 1 will consist of two sensors, which are two cameras, a left and a right; also we have two actuators: speed traction and rotation speed. The cameras provide us with pixel information as an array of numbers that serve to guide our Formula 1. The circuit can be seen in the following image:
The steps we must follow are:
- Getting images from the two cameras (these images are in RGB color space):
imageLeft = self.sensor.getImageLeft()
imageRight = self.sensor.getImageRight()
- To filter the image and stay only with the road, we must first transform the images to the HSV color space:
imageRight_HSV = cv2.cvtColor(imageRight, cv2.COLOR_RGB2HSV)
imageLeft_HSV = cv2.cvtColor(imageLeft, cv2.COLOR_RGB2HSV)
- Then we have to choose a minimum and maximum value to filter the rest of the image and stay only with the road:
value_min_HSV = np.array([0, 235, 60])
value_max_HSV = np.array([180, 255, 255])
- We filter the images obtaining a binary images:
imageRight_HSV_filtered = cv2.inRange(imageRight_HSV, value_min_HSV, value_max_HSV)
imageLeft_HSV_filtered = cv2.inRange(imageLeft_HSV, value_min_HSV, value_max_HSV)
- The images we get from the previous function have only one channel, so to show the images have to use the following function of three channels, for which we use three times the same image:
imageRight_HSV_filtered_Mask = np.dstack((imageRight_HSV_filtered, imageRight_HSV_filtered, imageRight_HSV_filtered))
imageLeft_HSV_filtered_Mask = np.dstack((imageLeft_HSV_filtered, imageLeft_HSV_filtered, imageLeft_HSV_filtered))
We show the images:
#SHOW THE FILTERED IMAGE ON THE GUI
self.setRightImageFiltered(imageRight_HSV_filtered_Mask)
self.setLeftImageFiltered(imageLeft_HSV_filtered_Mask)
Here, we see the images of the right and left cameras. The images are in color and binary:
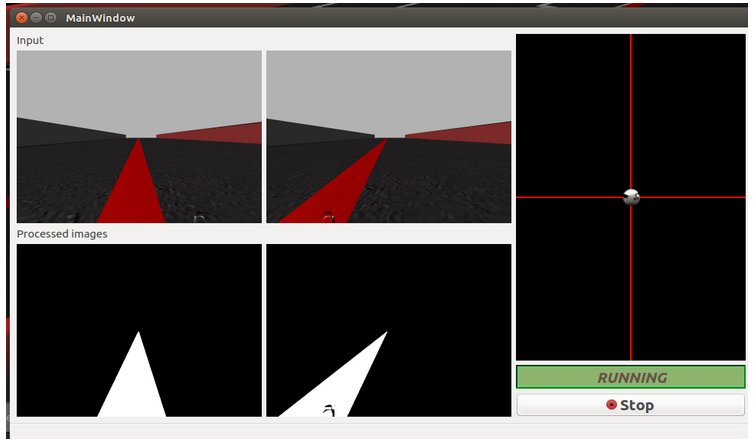
- In the binary image, the road is white and the rest is black. With this image we can analyze the points of interest of the image. First we must find the two endpoints of the red line:
position_pixel_left = []
position_pixel_right  = []

    for i in range(0, columns-1):
        value = imageLeft_HSV_filtered[365, i] - imageLeft_HSV_filtered[365, i-1]
        if(value != 0):
            if (value == 255):
                position_pixel_left.append(i)
            else:
               position_pixel_right.append(i-1)
In the previous code we see that we look at the row 365 and we have to add to the left array the number of the column, where “value” (subtracted from the current pixel and the preceding pixel) is 255, and we will add to the right array the number of the column, where “value” is -255.
- We’ll have to check that the two arrays are filled so that there is not a problem of execution. If there is an empty array we fill it and also calculate the average position of the road:
if ((len(position_pixel_left) != 0) and (len(position_pixel_right) != 0)):
    position_middle = (position_pixel_left[0] + position_pixel_right[0]) / 2
elif ((len(position_pixel_left) != 0) and (len(position_pixel_right) == 0)):
    position_middle = (position_pixel_left[0] + columns) / 2
elif ((len(position_pixel_left) == 0) and (len(position_pixel_right) != 0)):
    position_middle = (0 + position_pixel_right[0]) / 2
else:
    position_pixel_right.append(1000)
    position_pixel_left.append(1000)
    position_middle = (position_pixel_left[0] + position_pixel_right[0])/ 2
- We calculate the desviation of our car:
desviation = position_middle - (columns/2)
- We do a P control, for that we use different taction and rotation speeds:
if (desviation == 0):
    self.sensor.setV(10)
elif (position_pixel_right[0] == 1000):
    self.sensor.setW(-0.0000035)
elif ((abs(desviation)) < 85):
    if ((abs(desviation)) < 15):
        self.sensor.setV(6)
    else:
        self.sensor.setV(3.5)
    self.sensor.setW(-0.000045 * desviation)
elif ((abs(desviation)) < 150):
    if ((abs(desviation)) < 120):
        self.sensor.setV(1.8)
    else:
        self.sensor.setV(1.5)
    self.sensor.setW(-0.00045 * desviation)
else:
    self.sensor.setV(1.5)
    self.sensor.setW(-0.005 * desviation)
Here, we see a video of this practice: