Week 5 - Setting up CUDA for Deep Neural Networks
As we saw in the previous post, we are very close to finally playing with some machine learning algorithms for our road following car. But as always, first we need to prepare the playground before we dive deep into the machine learning problems, and by preparing I mean installing the ever famous CUDA toolkit, this tool will allow us to train and predict algorithms with GPU-acceleration by using the graphic card in our local machine. Given that I have a RTX 3060 6Gb graphics card in my laptop, it would be a total loss not to test it.
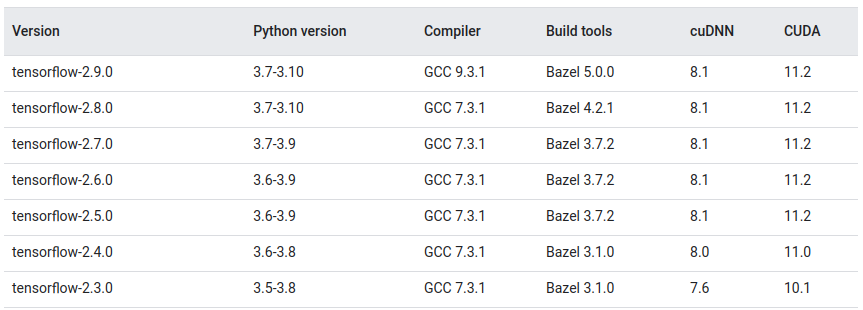
Having said that, installing CUDA for our purpose is not a simple task. The installation itself is pretty straight forward, but the environment in which we are going to use it, plays an important role when choosing the version of the software we are going to use it on. To do this, we must be thoughtful with four things that are going to be the ones that will cause the most problems if they are not compatible with each other:
- CUDA Toolkit 11.0
- Python 3.6
- cuDNN 8.0
- Tensorflow 2.4.0
The setting we finally choosed was defined firstly by the Carla Simulator, because we are using an old version of Carla 0.9.2 some libraries can only be used on a certain version of python, we have only tested them on 3.5 and 3.6. And secontly, Tensorflow, for it plays a huge rol on the selection of a certain CUDA and cuDNN version. On the Tensorflow installation website, we can find a table with multiple tested configurations.

Once we have our tensorflow supported by CUDA for high-optimized performance, the next step is to read, understand and test some code from the repository DeepLearningStudio. The respository contains code to train models (like a formula 1 car to follow a line) with deep learning which serves us as a guide of how to tackle this kind of problems. At first, the idea was to make a training session from the local machine without changing anything from the original code but because the recommended python version was the 3.10, this caused some compatibility issues with the latest CUDA versions from NVIDIA. To avoid stalling to much on this training part (I will deal with the training part later in the future), I decided to directly download some trained models and load them onto the code I had to make a car follow the road on the Carla Simulator.
With everything configurated it was time to configurate the model so that it recieves an image as input, and return as output two values, the velocity and the steering angle. Once it was coded, the execution showed us that the predictions made by the neural network took 5 seconds, and it was obvious something was off, because with the use of CUDA, even a second is too much for an autonomous vehicle application. By doing some changes in the Nvidia Driver and files inside the CUDA Toolkit, we were able to lower the prediction time to 0.2 seconds, and making a prediction every 10 frames we can make the simulation go smoother without deleting too much information of the actual state of the car.
As we can see in the video it follows poorly the red line on the ground. In the next video, we can take a better look on how poorly is performing our car, for it is not even trying to follow the red line on the road.
Further testing will need to be made to check wether this behaviour is expected for our code or not.
