Deepracer teleop
Deepracer Teleoperator
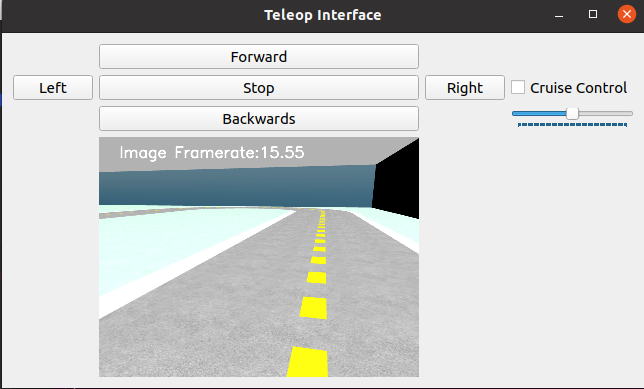
After some weeks of work, the ROS & Gazebo environment containing the Amazon Deepracer robot now can be controlled using a simple Teleop program that allows the user to use discrete movements like forward, backwards, left, right and also allows a slider to be used controlling the steering wheel whilst the motors are set to drive forward simultaneously. The teleop window also contains the camera view of the robot.
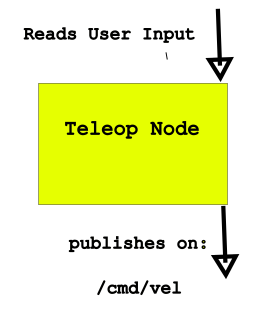
Target diagram
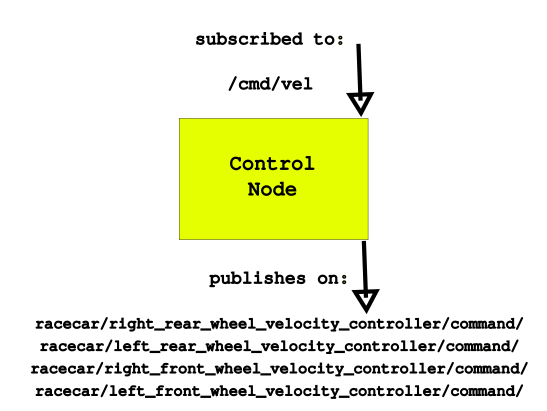
The behaviour of the teleop will be defined by the following diagram:

Setup of the environment
The teleoperator relies entirely on the control library of the Deepracer that we have implemented in order to make it work. By analyzing the deepracer model provided and understanding its posibilities, we found the following movable links and joints:
- Left Front wheel transmission (controlled via speed)
- Right Front wheel transmission (controlled via speed)
- Left Rear wheel transmission (controlled via speed)
- Right Rear wheel transmission (controlled via speed)
- Left wheel axle (controlled via position)
- Right wheel axle (controlled via position)
The four wheels transmission make the robot behave like a 4X4 car and the steering axle controlled via position for each wheel makes the car Ackermann-driven. Knowing this information and the posibilities given by the ROS Control package, we have implemented the following controllers for each joint:
left_rear_wheel_velocity_controller:
    type: velocity_controllers/JointVelocityController
    joint: left_rear_wheel_joint
    interface_name: velocity
    pid: {p: 1.0, i: 0.0, d: 0.0, i_clamp: 0.0}


right_rear_wheel_velocity_controller:
  type: velocity_controllers/JointVelocityController
  joint: right_rear_wheel_joint
  interface_name: velocity
  pid: {p: 1.0, i: 0.0, d: 0.0, i_clamp: 0.0}


left_front_wheel_velocity_controller:
  type: velocity_controllers/JointVelocityController
  joint: left_front_wheel_joint
  interface_name: velocity
  pid: {p: 0.5, i: 0.0, d: 0.0, i_clamp: 0.0}


right_front_wheel_velocity_controller:
  type: velocity_controllers/JointVelocityController
  joint: right_front_wheel_joint
  interface_name: velocity
  pid: {p: 0.5, i: 0.0, d: 0.0, i_clamp: 0.0}

left_steering_hinge_position_controller:
  type: position_controllers/JointPositionController
  joint: left_steering_hinge_joint
  interface_name: position
  pid: {p: 1.0, i: 0.0, d: 0.5}

right_steering_hinge_position_controller:
  type: position_controllers/JointPositionController
  joint: right_steering_hinge_joint
  interface_name: position
  pid: {p: 1.0, i: 0.0, d: 0.5}
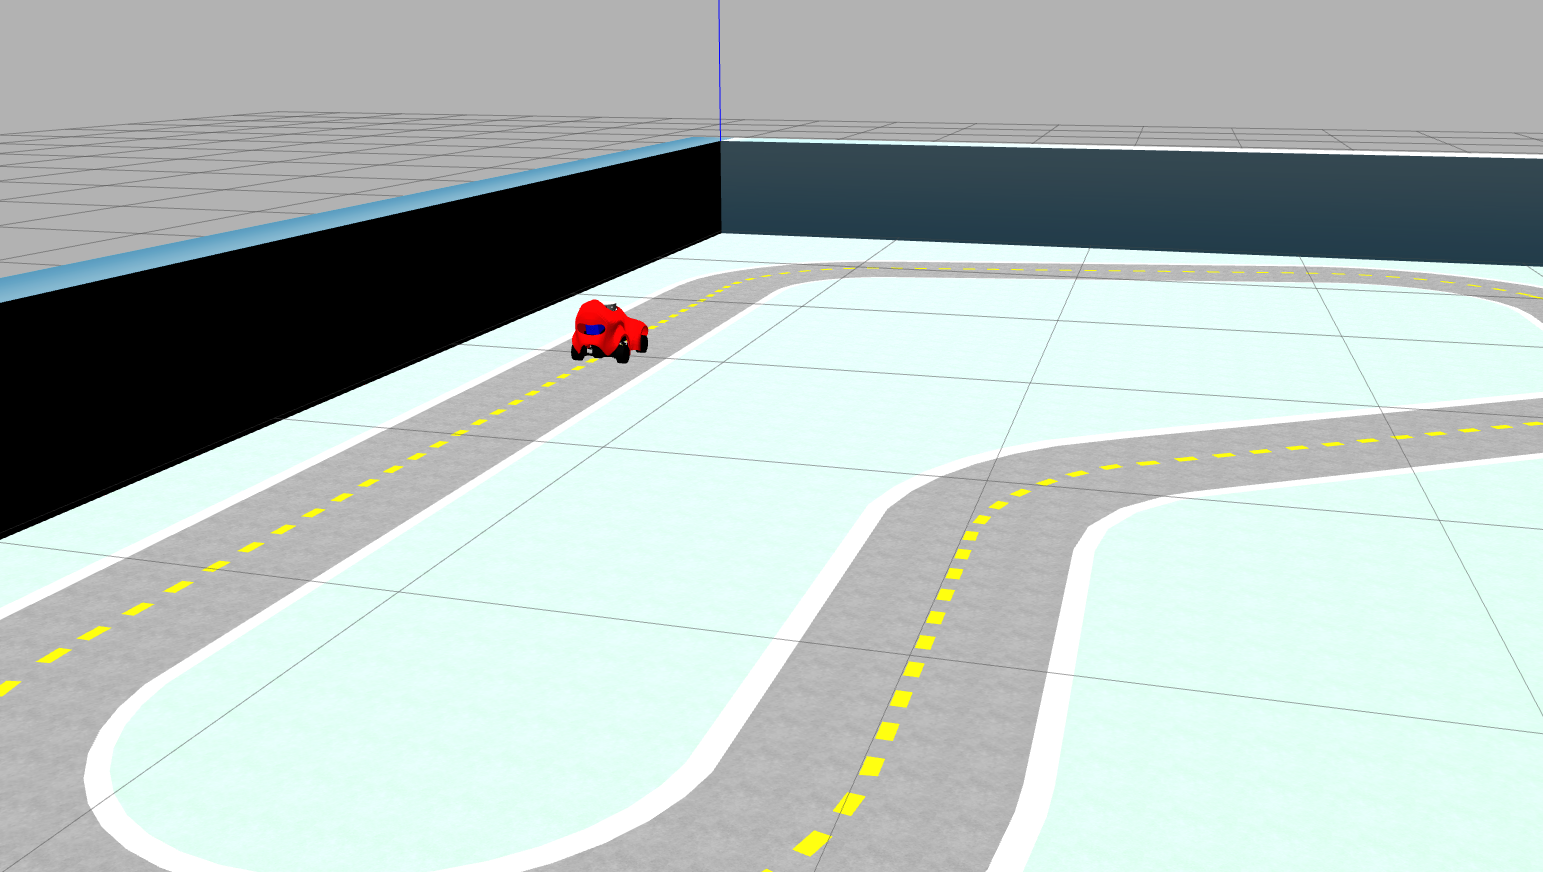
This controllers are brought up in the launch file of the world, that also launches the robot and the default track where it is driven:
<rosparam file="$(find track_model)/config/agent_control.yaml" command="load" />
<node name="controller_spawner" pkg="controller_manager" type="spawner" respawn="false" output="screen" ns="/racecar" args="joint_state_controller left_rear_wheel_velocity_controller right_rear_wheel_velocity_controller left_front_wheel_velocity_controller right_front_wheel_velocity_controller left_steering_hinge_position_controller right_steering_hinge_position_controller" />
After launching the world with the vehicle, we obtain the following result:
Control node of the robot
Before implementing the Teleop, it was needed to create a control node in where, basing the inputs given by the user with linear and angular velocity, it publishes the information on the topics that were defined before. This node will subscribe to the topic /cmd/vel and publish in the Gazebo Ros Control topics mentioned above:
Configuration of the topics
This topics are actually configured on a particular python file, topics.py, in where they can be easily changed in case the control is performed on other environment, for example, the real robot.
#!/user/bin/env python3
CAMERA_TOPIC = "/camera/image"

# Control topics over gazebo simulation
RIGHT_REAR_TOPIC = "/racecar/right_rear_wheel_velocity_controller/command"
LEFT_REAR_TOPIC = "/racecar/left_rear_wheel_velocity_controller/command"
RIGHT_FRONT_TOPIC = "/racecar/right_front_wheel_velocity_controller/command"
LEFT_FRONT_TOPIC = "/racecar/left_front_wheel_velocity_controller/command"

LEFT_DIRECTION_TOPIC = "/racecar/left_steering_hinge_position_controller/command"
RIGHT_DIRECTION_TOPIC = "/racecar/right_steering_hinge_position_controller/command"

# teleop communication with the control node
COMMANDED_DATA_TOPIC = "/cmd_vel"
Car control library
In order to perform gazebo control on the car, we use the control.py node. This node contains a class: CarControl, who is in charge of subscribing to /cmd/vel to receive the data inputed by the user (teleop) or by other nodes (follow line/ lane detector…). This class initializes the subscriber for /cmd/vel and ROS publishers for all the four movable wheel joints:
- Front left wheel
- Front right wheel
- Rear left wheel
- Rear Right wheel
It also sets the rate of the publisher on 10. At the moment, it seems just fine but it may need to be adjusted on tasks who require bigger reactivity (for example, autonomous control).
self.rightRearPub = rospy.Publisher(topics.RIGHT_REAR_TOPIC, Float64, queue_size=10)
self.leftRearPub = rospy.Publisher(topics.LEFT_REAR_TOPIC, Float64, queue_size=10)
self.rightFrontPub = rospy.Publisher(topics.RIGHT_FRONT_TOPIC, Float64, queue_size=10)
self.leftFrontPub = rospy.Publisher(topics.LEFT_FRONT_TOPIC, Float64, queue_size=10)

self.leftSteeringPub = rospy.Publisher(topics.LEFT_DIRECTION_TOPIC, Float64, queue_size=10)
self.rightSteeringPub = rospy.Publisher(topics.RIGHT_DIRECTION_TOPIC, Float64, queue_size=10)
The class consists on three methods than can be used by the user, but any control application may work only using the very last of them:
-
Linear drive: apply the value (V) of linear speed to the four wheels of the car.
-
Angular drive: Given an angle, inputs it to the wheels. As they are controlled via position, the angle (inputted in degrees) will be converted to radians and published on both left and right steering hinges. If the angle is bigger than 60, it will be capped to 60 to avoid steering issues.
-
Drive: Drive will simply apply the V and W value passed to the car using the linearDrive and angularDrive methods.
This function usage is reduced mainly to the drive function. The drive function is called inside the control node itself, in where the subscriber, based on the msgs it receives, calls the method to publish on gazebo topics:
On init:
self.sub = rospy.Subscriber(topics.COMMANDED_DATA_TOPIC, Twist, self.subscriberCb)
On the class:
def subscriberCb(self, msg):
  self.drive(msg.linear.x, msg.angular.z)
The main would easily just initialize the node and spin it:
def main():
    rospy.spin()

rospy.init_node("control")
controlEngines = CarControl()

if __name__ == "__main__":
    main()
Teleoperator
Based on the car control node that we have just seen, we can now consider implementing the teleop to have a basic notion on how the car moves. The teleoperator window that we saw above contained basic discrete operations: Forward, backwards, left, right, and a slider that controls its steering angle, next to a checkbox that will set the linear velocity to a constant value if checked.
Framework: QT
The entire teleop is based on the PyQT5 library. It uses features like labels, widgets, push buttons and sliders to create a friendly GUI for the user to control the robot.
Camera image
The first thing inputted into the QT window is the camera image. The camera image is obtaining by subscribing to the camera topic, advertised and defined on the robot URDF. In order to use the image in QT interface, it firstly needs to be converted from topic to openCV. This is done by using a bridge from the ImgMsg to openCV.
The camera image also displays the current FPS. This is done by simply measuring the time taken between picture and picture and inverting it (obtaining the image frequency). With OpenCV, we can easily use a putText function to display the framerate on the view. After that, we will just use the convertCVToQT method:
def convertCVtoQT(window, cv_img):
        """Convert from an opencv image to QPixmap"""
        rgb_image = cv2.cvtColor(cv_img, cv2.COLOR_BGR2RGB)
        h, w, ch = rgb_image.shape
        bytes_per_line = ch * w
        convert_to_Qt_format = QtGui.QImage(rgb_image.data, w, h, bytes_per_line, QtGui.QImage.Format_RGB888)
        p = convert_to_Qt_format.scaled(int(window.display_width/2), int(window.display_height/2), Qt.KeepAspectRatio)
        return QPixmap.fromImage(p)
to get the qtImage and set it as a label on the QT layout.
Control functions
With the way QT works, each button / slider / checkbox needs to be assigned to a function. For the discrete buttons, we have defined the following functions:
def fwdFunct():
    msg = Twist()
    msg.linear.x = DEFAULT_SPEED
    msg.angular.z = 0
    movementPublisher.publish(msg)
    rospy.sleep(LINEAR_WAIT)
    msg.linear.x = 0
    movementPublisher.publish(msg)

def bwdFunct():
    msg = Twist()
    msg.linear.x = -DEFAULT_SPEED
    msg.angular.z = 0
    movementPublisher.publish(msg)
    rospy.sleep(LINEAR_WAIT)
    msg.linear.x = 0
    movementPublisher.publish(msg)

def leftFunct():
    msg = Twist()
    msg.linear.x = DEFAULT_SPEED
    msg.angular.z = -DEFAULT_ANGULAR_SPEED
    movementPublisher.publish(msg)
    rospy.sleep(RECT_ANGLE_TURN_WAIT)
    msg.linear.x = 0
    msg.angular.z = 0
    movementPublisher.publish(msg)

def rightFunct():
    msg = Twist()
    msg.linear.x = DEFAULT_SPEED
    msg.angular.z = DEFAULT_ANGULAR_SPEED
    movementPublisher.publish(msg)
    rospy.sleep(RECT_ANGLE_TURN_WAIT)
    msg.linear.x = 0
    msg.angular.z = 0
    movementPublisher.publish(msg)

def stopFunct():
    msg = Twist()
    msg.linear.x = 0
    msg.angular.z = 0
    movementPublisher.publish(msg)
The twist msgs will be published onto the /cmd/vel topic as explained before. The constants may be tweaked to adjust the behaviour of the teleop as desired. The checkbox button is also controlled by the following function:
def ccFunct(butt):
    global sliderControl
    sliderControl = butt.isChecked()
In any change of the slider, based on the checkbox value we will get linear movement or not.
Using QT functions and methods, we will add the buttons and connect them to the functons created above. The slider works in a similar way, but the function will be an attribute of the interface class, who will get as an input the value of the slider to the angular z of the message and base its linear speed on the checkbox value:
def treatValue(self):
        msg = Twist()
        msg.angular.z = self.directionalSlider.value() / 10
        if sliderControl:
            msg.linear.x = DEFAULT_SPEED
        else:
            msg.linear.x = 0
        movementPublisher.publish(msg)

def addSliders(self):
    self.directionalSlider = QSlider(Qt.Horizontal)
    self.directionalSlider.setMinimum(-50)
    self.directionalSlider.setMaximum(50)
    self.directionalSlider.setValue(0)
    self.directionalSlider.setTickPosition(QSlider.TicksBelow)
    self.directionalSlider.setTickInterval(1)
    self.layout.addWidget(self.directionalSlider, 2, 3)
    self.directionalSlider.valueChanged.connect(self.treatValue)
After running the interface, we will obtain the result we had before:
Videos of the teleop working.
In this two videos we can see the teleop working and how the robot completes a lap around the track using the slider: ../images/discrete_freeroam.mp4
../images/discrete_freeroam.mp4